Welcome to Taxo Tape
Thermal Management Solutions for High-Brightness LED Systems
Introduction
1.1 Why thermal management is critical for high-brightness LEDs
High-brightness LEDs are marketed for long lifetime and high efficiency, but in real projects their performance is often limited by heat. Only part of the electrical power is converted into light; the rest becomes heat inside a very small area around the LED chip. If this heat is not removed effectively, the junction temperature (Tj) rises quickly.
Once Tj exceeds the recommended range, the lumen output drops, the color point drifts, and the expected lifetime is no longer guaranteed. In high-power luminaires such as street lighting, industrial high-bays or automotive lamps, even a few degrees of extra temperature margin can make the difference between a robust design and frequent field failures. That is why thermal management is now a key design topic, not just a “nice to have” accessory at the end of the project.
1.2 Typical problems caused by poor heat dissipation
When heat cannot flow from the LED junction to the ambient efficiently, several visible and invisible problems appear:
Lumen decay – Light output gradually decreases over time (L70/L80 reached much earlier than expected).
Color shift – The correlated color temperature (CCT) drifts and the chromaticity point moves, leading to inconsistent visual appearance between fixtures or within the same luminaire.
Lifetime reduction – High temperature accelerates chemical and material degradation in LED packages, phosphors, encapsulants and driver components.
Reliability issues – Solder joints, vias, adhesives and plastics experience greater thermal stress, which can lead to cracking, delamination or open circuits.
For brands that promise 50,000–100,000 hours of life, these issues are not only technical but also commercial. Warranty claims, replacement costs and damage to brand reputation often trace back to inadequate thermal design or incorrect use of thermal interface materials.
1.3 Purpose and scope of this article
This article is written for LED luminaire designers, hardware engineers and technical buyers who need a practical overview of thermal management. We will:
Explain how heat is generated and flows inside high-brightness LED systems.
Highlight typical thermal design challenges in modern LED applications.
Introduce the key types of thermal interface materials (TIMs) used between LED modules, heat spreaders and heat sinks.
Provide selection tips so you can match the right TIM to your application and constraints.
The focus is on practical engineering concepts that can be applied directly in real projects, rather than purely theoretical models.
Understanding Heat in High-Brightness LED Systems
2.1 How LEDs convert electrical power into light and heat
An LED is often described as an efficient light source, but even a “high-efficiency” LED still converts a significant portion of input power into heat. When current flows through the LED chip, some electrons recombine radiatively and emit photons (light), while others recombine non-radiatively and release energy as heat.
If an LED has, for example, 40% wall-plug efficiency, that means 40% of the electrical power becomes light and 60% becomes heat. This heat is concentrated in a very small chip area, so the heat flux (W/cm²) is high. Managing this local heat flux is the primary role of the thermal system.
2.2 Key heat sources in LED systems
In a real luminaire, heat is not only generated by the LED chip. Main contributors include:
LED chip / package – The main heat source; determines junction temperature.
MCPCB / PCB – Conducts heat away from the LED package; dielectric layer and copper thickness matter.
LED driver – Power conversion components (MOSFETs, inductors, capacitors) also generate heat, especially at high ambient temperatures.
Secondary optics – Lenses, reflectors and covers may trap heat or limit airflow, increasing local temperatures.
A good thermal design considers all of these contributors and how they interact, not just the LED junction in isolation.
2.3 Critical temperature points: junction, case and ambient
Three temperature points are particularly important in LED thermal analysis:
Junction temperature (Tj) – The temperature inside the LED chip. This is the most critical parameter; LED manufacturers specify maximum Tj and provide lifetime data as a function of Tj.
Case or board temperature (Tc / Ts) – The temperature measured on the LED package case or the solder point on the MCPCB. This is easier to measure and often used as a reference for validation.
Ambient temperature (Ta) – The temperature of the air surrounding the luminaire, inside or outside the enclosure.
The thermal path between these points is described by thermal resistance values. A simplified view is:
Tj = Ta + (Total thermal resistance) × (Power loss)
Reducing thermal resistance between junction and ambient is the goal of thermal management.
2.4 Impact of thermal stress on reliability
LED systems are typically exposed to thermal cycling: on/off switching, daily ambient temperature swings, or seasonal changes. These cycles cause materials with different coefficients of thermal expansion (CTE) to expand and contract at different rates, creating mechanical stress. Over time this leads to:
Solder joint fatigue – Micro-cracks in solder joints or vias, eventually causing intermittent or permanent electrical failure.
Delamination – Separation between layers in MCPCBs, between potting and components, or between TIMs and mating surfaces.
Cracking of materials – Cracks in encapsulants, lenses or plastic housings, which can change optical performance and allow moisture ingress.
Proper selection and design of TIMs (with suitable softness, compressibility and adhesion) help buffer these stresses and maintain good thermal contact over the product lifetime.
Thermal Design Challenges in Modern LED Applications
3.1 High power density and compact form factors
Customers expect luminaires to be smaller and more powerful, with clean designs and minimal visible heat sinks. This leads to high power density: more watts in less space. The result is less surface area to dissipate heat and higher internal temperatures. Designers must balance aesthetic requirements with the need for effective heat spreaders, fins, and airflow paths.
3.2 Enclosed or sealed luminaires
Many applications require sealed or enclosed fixtures to meet IP65/IP66/IP67 ratings or to protect against dust, moisture and chemicals. Street lights, tunnel lights, horticulture lights and some industrial luminaires fall into this category.
In these designs, natural convection is restricted and the air inside the housing can become significantly hotter than the external ambient. The thermal path from LED to outer housing becomes even more critical, and TIMs between MCPCB, heat spreader and housing must be carefully chosen to minimize thermal resistance.
3.3 High ambient temperature environments
In applications such as factories, warehouses, outdoor locations in hot climates, or automotive compartments, the ambient temperature is already high. The allowable temperature rise from ambient to junction becomes smaller.
For example, if Ta is 45–50°C, a 30–40°C temperature rise could already push Tj close to its limit. In such scenarios, standard materials may no longer be sufficient; higher-conductivity TIMs, better heat spreaders or more aggressive heat sink designs are needed to keep Tj under control.
3.4 Regulatory and efficiency requirements
LED products must meet various standards and regulations related to lumen maintenance, efficacy and safety. Long-term tests (such as LM-80 and TM-21 based projections) depend heavily on the operating temperature of the LED. Energy labeling schemes and eco-design regulations push manufacturers to increase lumen per watt, which in turn makes every watt of heat more critical.
A robust thermal design helps ensure that tested performance can be replicated in the field, reducing the risk that products fail to meet regulatory or customer expectations over their lifetime.
3.5 Cost and manufacturability constraints
Even the best thermal solution is not acceptable if it is too expensive or difficult to assemble. LED manufacturers must consider:
Material cost of TIMs, heat sinks and heat spreaders
Assembly processes (manual placement vs. automated dispensing or lamination)
Tolerances and flatness of mating surfaces
Rework and repair procedures
The challenge is to find a solution that delivers adequate thermal performance while fitting into existing production lines and target cost structures. This is where selecting the appropriate type of TIM becomes especially important.
Thermal Path in an LED System: From Junction to Ambient
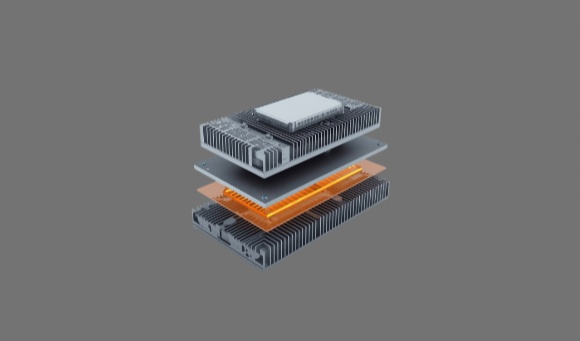
4.1 The concept of a complete thermal stack-up
The thermal path is the chain that connects the LED junction to the surrounding air. Instead of focusing on a single component, engineers should look at the entire thermal stack-up: every layer that heat must cross. Any weak link with high thermal resistance will limit the performance of the whole system.
4.2 Typical thermal path layers
A simplified thermal path in a high-brightness LED luminaire might look like this:
LED die → LED package substrate → solder joint → MCPCB (or FR-4/metal core PCB) →
TIM (gap pad / grease / gel / tape / PCM) → heat spreader or housing → heat sink → air
In some designs, additional layers such as graphite sheets or insulation pads are added to spread heat or provide electrical isolation. Each layer has its own thermal conductivity, thickness and contact resistance, all of which must be considered during design.
4.3 Thermal resistance and contact resistance at each interface
Thermal resistance (Rth, in K/W) represents how difficult it is for heat to flow through a material or interface. It depends on:
Thermal conductivity of the material (W/m·K)
Thickness of the material
Contact area
Quality of surface contact
Even if a material has relatively high thermal conductivity, poor contact (due to surface roughness, warpage or low pressure) can create contact resistance that dominates the total Rth. This is why air gaps are such a problem: air has very low thermal conductivity, so even thin gaps can drastically increase thermal resistance.
TIMs are specifically designed to fill these gaps and conform to surface irregularities, reducing contact resistance and stabilizing thermal performance over time.
4.4 How to evaluate thermal path performance
The overall thermal path performance can be evaluated in several ways:
Analytical calculation – Summing up Rth values of each layer to estimate Tj at a given power and ambient.
Simulation – Using CFD or thermal simulation tools to analyze heat flow, hotspot locations and transient behavior.
Measurement – Placing thermocouples at key locations (e.g., Tc, housing surface) or using infrared cameras to verify temperature distribution in prototypes.
Both steady-state and transient conditions should be considered. Some applications (such as flashing signals or pulsed lighting) generate dynamic load profiles where transient thermal impedance and heat capacity become more important than pure steady-state Rth.
Key Thermal Interface Materials (TIMs) for High-Brightness LEDs
5.1 Role of TIMs in LED thermal management
Thermal interface materials sit between two solid surfaces to improve heat transfer. In LED systems, TIMs:
Fill microscopic gaps and surface irregularities that would otherwise trap air.
Compensate for mechanical tolerances and warpage between PCBs, modules and housings.
Provide electrical insulation where required.
Buffer mechanical stresses produced by thermal cycling and vibration.
Choosing the right TIM type is therefore a critical part of the overall thermal design, not just a consumable added at the last minute.
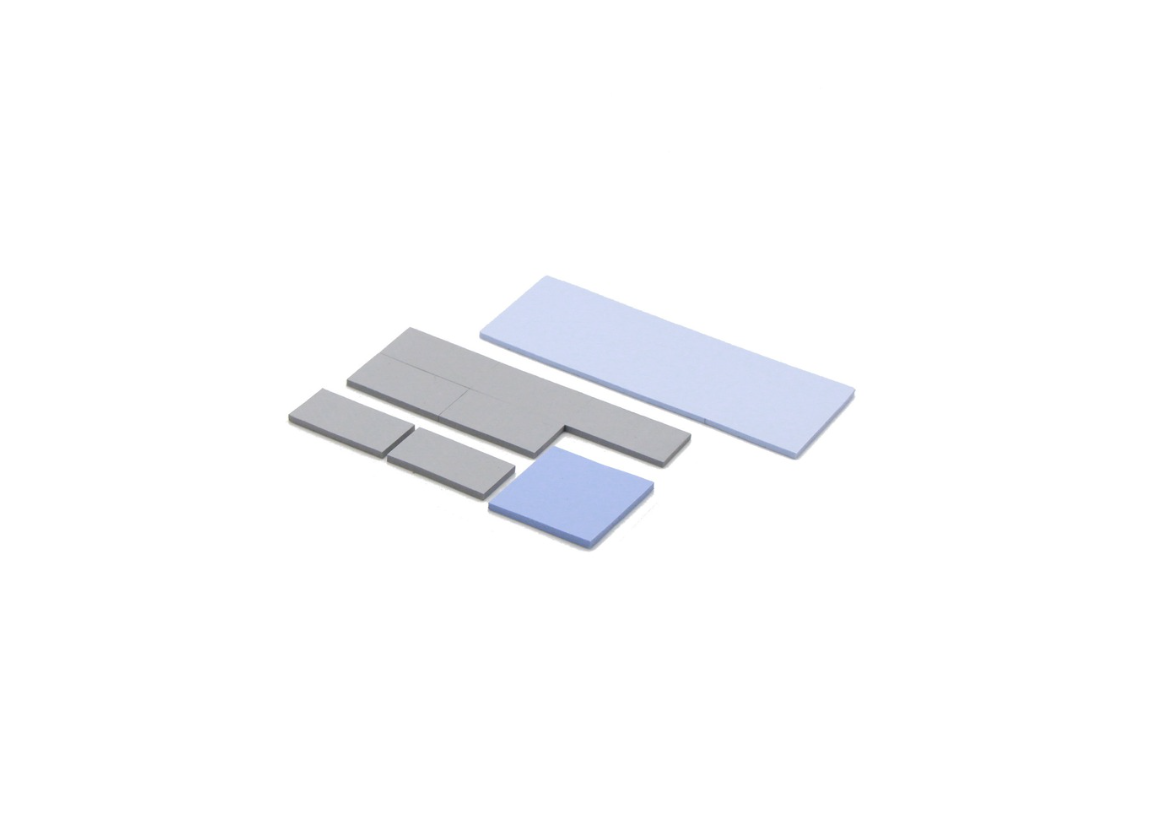
5.2 Thermal gap pads
Typical use cases
Thermal gap pads are soft, compliant sheets placed between an LED module (COB, MCPCB, linear board) and a heat sink or housing. They are widely used in:
COB spotlights and downlights
High-bay and low-bay luminaires
LED drivers and power modules
MCPCBs mounted on metal housings or extruded heat sinks
Benefits
Compliance – Can absorb tolerances and unevenness, providing good contact over large areas.
Ease of assembly – Usually supplied in sheets or die-cut shapes; can be placed manually or by pick-and-place.
Reworkability – Can be removed and replaced during rework or maintenance in many designs.
Key parameters
Thermal conductivity (W/m·K) – Directly influences thermal performance; should be selected based on power density and allowed temperature rise.
Hardness / softness – Determines how well the pad conforms to surfaces and how much pressure is needed.
Compression set – Ability to maintain thickness and contact over time after compression.
Thickness – Balances gap-filling capability and thermal resistance; thicker pads fill bigger gaps but add resistance.
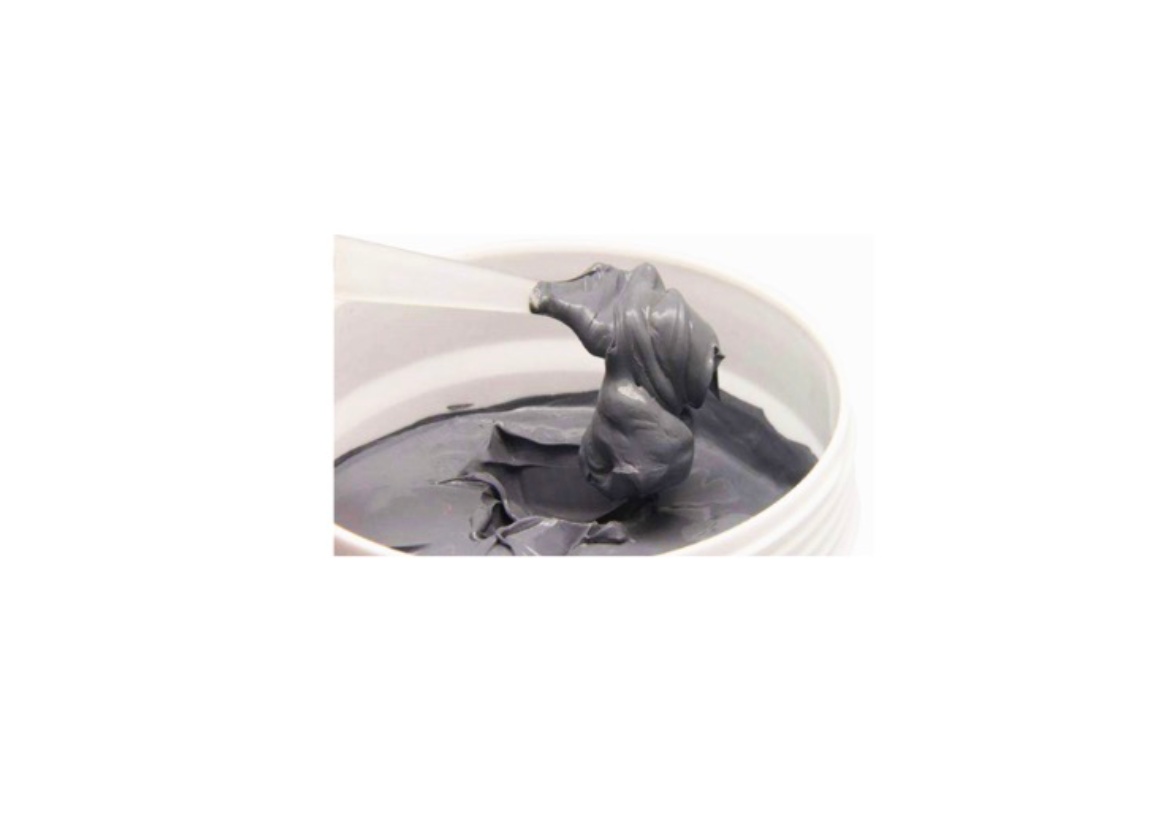
5.3 Thermal greases / thermal pastes
When to use greases vs. pads
Thermal greases are viscous materials applied in thin layers between two rigid, relatively flat surfaces. They are often chosen when:
The gap between surfaces is small and tightly controlled.
Very low interfacial thermal resistance is required.
Automated dispensing is available for high-volume production.
In contrast, gap pads are preferred when gaps are larger or tolerances are high.
Advantages
Low interfacial resistance – Can be applied in very thin bond lines, minimizing thermal resistance.
Good wetting – Flows into micro-asperities and fills small voids effectively.
Considerations
Pump-out resistance – Under thermal cycling or vibration, grease can migrate away from the interface, creating voids. Formulation and mechanical design must minimize this risk.
Long-term stability – Bleeding, drying or separation over time can reduce performance; materials should be tested for aging in relevant conditions.
Dispensing process – Requires suitable equipment, process control and cleanliness to ensure consistent application and avoid contamination.
5.4 Thermal gels
Thermal gels combine some characteristics of pads and greases. They are soft, form-stable materials that can be dispensed like a fluid but cure or “set” into a gel-like state.
Hybrid behavior
Like greases, they can be dispensed to fill complex shapes and varying gaps.
Like pads, they provide mechanical compliance and are less prone to pump-out in many applications.
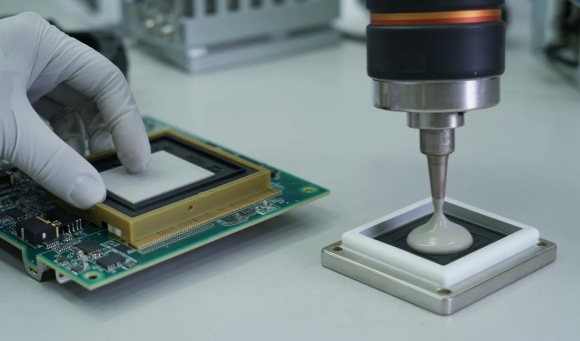
Suitable for
Automated dispensing – Compatible with robotic or time-pressure dispensing systems for high-volume manufacturing.
Uneven surfaces – Can handle larger gap variations than greases while still forming a continuous thermal path.
Typical applications
High-power LED modules on metal housings
LED drivers and power electronics sections
Large area interfaces where manual pad placement is difficult or inefficient
5.5 Thermal double-sided adhesive tapes
Thermal adhesive tapes provide both bonding and thermal conduction in a single material.
Combining bonding and thermal conduction
They allow modules, PCBs or LED strips to be fixed mechanically while also providing a thermal path to a metal profile or housing. This can simplify assembly by reducing the number of components and processes.
Applications
LED strips mounted in aluminum profiles or channels
Linear LED boards in troffers and panels
Backlight units and edge-lit systems where screws are not preferred
Key considerations
Peel strength and shear strength – Must provide sufficient mechanical bonding over the product lifetime.
Initial tack – Affects ease of placement and repositioning during assembly.
Rework – Some tapes allow module removal with heat or tools; others are more permanent. Rework needs should be considered early in design.
5.6 Phase change materials (PCM)
Phase change materials are solid at room temperature and soften or melt at a specific phase change temperature, typically close to the target operating temperature.
How PCM works
At lower temperatures, PCM behaves like a dry film for easy handling and assembly.
As temperature rises and reaches the phase change point, the material softens and flows slightly, filling microscopic gaps and achieving low interfacial thermal resistance.
Benefits
Very stable bond line thickness and reproducible performance.
Ideal for high-cycling applications, where repeated phase changes can actually help maintain good contact by re-flowing into new micro-gaps.
Design considerations
The chosen phase change temperature should match the expected operating temperature range of the LED module.
Proper clamping pressure is needed to ensure uniform wetting during the first heat-up cycle.
Surfaces should be clean and reasonably flat to fully benefit from the PCM behavior.
5.7 Graphite sheets / heat spreaders
Graphite materials are often used as heat spreaders in LED systems where thickness and weight must be minimized.
In-plane vs. through-plane conductivity
Graphite sheets typically have very high in-plane thermal conductivity, allowing heat to spread quickly across the plane.
Through-plane conductivity is lower, so they are mainly used to distribute heat laterally before it is transferred to another layer or heat sink.
Typical uses
Slim luminaires where traditional thick fins are not possible.
Edge-lit panels and backlight systems, to equalize temperature across the panel and avoid hotspots.
Compact architectural lighting where thermal spreading within a thin profile is required.
Graphite is often combined with TIMs (pads, gels, tapes) to form a complete thermal solution: the TIM ensures good contact to the graphite, and the graphite distributes heat to a larger cooling surface.
Selecting the Right Thermal Management Solution for Your LED Design
Choosing a thermal management solution is not only about picking the material with the highest thermal conductivity. The LED application, power level, mechanical design, and production method all influence which type of thermal interface material (TIM) is actually suitable.
6.1 Matching TIM Types to LED Application Scenarios
High-power outdoor lighting (street / roadway, floodlight)
High-power outdoor luminaires usually operate for long hours, often in harsh environments.
Typical thermal path: COB or MCPCB → TIM → cast aluminum or extruded aluminum housing / heat sink.
Soft thermal gap pads or dispensable thermal gels are often used to compensate for surface unevenness and tolerances while providing reliable thermal conduction.
In more demanding designs, gap pads can be combined with graphite heat spreaders to distribute heat over a larger area of the housing and reduce hot spots.
Indoor high-bay / low-bay industrial fixtures
High-bay and low-bay fixtures are installed at height, where maintenance is expensive and downtime is not welcome.
TIMs for these products must provide stable thermal performance over many years.
Thermal gap pads and thermal gels are commonly used between LED modules and heat sinks, as well as around driver components.
For automated production, dispensable thermal gels are often preferred because they can cover large or irregular areas with consistent thickness.
Automotive / signal lighting
Automotive lamps and signal lights see frequent on/off cycles, wide temperature swings, and vibration.
TIMs need not only good thermal conductivity but also excellent mechanical compliance to absorb stress caused by thermal expansion and vibration.
Soft gap pads or gels are usually more suitable than hard materials.
In compact designs, graphite sheets can be added to improve lateral heat spreading without adding much weight.
LED strips and linear lighting
LED strips and linear boards are typically mounted in aluminum profiles or channels.
Here, thermal double-sided adhesive tapes play a key role: they bond the strip to the profile and provide a continuous thermal path.
If a standard adhesive tape is used with poor thermal properties, LEDs can run hotter, leading to faster lumen decay and color shift.
For long channel lengths, consistent adhesion and thermal performance along the entire strip are important to avoid local hot spots.
Compact architectural and decorative luminaires
Architectural and decorative luminaires are often thin, light, and visually minimalist, with very limited room for traditional heat sinks.
Graphite sheets combined with thin TIM layers can help spread heat in a slim profile where finned heat sinks are not possible.
PCB-to-housing interfaces may use thin thermal pads, thermal adhesives, or phase change materials (PCMs) to reduce interface resistance.
For these designs, optimizing the entire thermal path is often more effective than only chasing very high thermal conductivity in a single layer.
6.2 Key Selection Criteria
When comparing different TIM options, the following criteria are usually the most important:
Thermal performance vs. thickness
Thermal conductivity alone does not define performance; the total thermal resistance (including thickness) is what matters.
Thicker layers fill larger gaps but increase thermal resistance. Within the constraints of your mechanical design, aim for the thinnest practical bond line.
Electrical insulation requirements
If the LED board or heat source is at a high potential relative to the housing, the TIM may need to provide electrical insulation as well as thermal conduction.
In this case, check the dielectric strength and breakdown voltage in addition to thermal specifications.
Mechanical compliance and assembly pressure
Softer TIMs require less pressure to conform to surfaces, which is useful when housings or PCBs are thin and cannot tolerate high clamping force.
Harder or more rigid materials may struggle to bridge tolerance stacks or warped surfaces, leading to partial contact and higher thermal resistance.
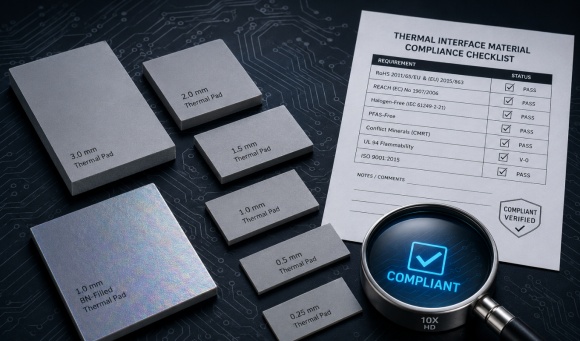
Flammability rating and UL compliance
For many professional luminaires, especially those going to North America or public spaces, flammability ratings (e.g. UL 94) and related safety approvals are mandatory.
Make sure the TIM you select fits into your overall safety and certification strategy.
Long-term reliability (aging, thermal cycling, humidity)
High temperature, high humidity, and repeated thermal cycling can cause TIMs to dry out, pump out, or lose adhesion.
For products with 5–10 year warranties, look for materials with proven aging data under conditions similar to your application.
Cost-performance balance
The “best” solution is one that meets thermal and reliability targets while fitting the cost and process constraints of your production line.
Sometimes small changes to the mechanical design (improved flatness, larger contact area, better screw pattern) allow the use of more cost-effective TIMs without sacrificing performance.
Practical Design Tips and Common Mistakes to Avoid
Even with good materials, many thermal issues come from design and assembly details. The points below often determine whether a thermal solution works as intended in the field.
7.1 Ensuring Full Contact: Surface Flatness and Pressure Distribution
Good thermal contact depends on both the TIM and the mechanical design.
Aim for flat, clean mating surfaces without burrs, sharp edges, or heavy machining marks.
Use screw locations, clips or springs that provide even pressure across the entire interface area, rather than concentrating force in just one or two points.
For large pads or gel areas, verify in prototypes how the material behaves after compression—actual contact can differ from what drawings suggest.
7.2 Avoiding Air Gaps and Voids in Critical Interfaces
Air is a very poor thermal conductor. Small gaps can undo much of the benefit provided by a good TIM.
Make sure the TIM fully covers the intended contact area, especially near high-power components.
For dispensable materials, control dispensing paths, speed and volume to minimize trapped air or voids.
During development, consider cross-sections, X-ray inspection or IR camera images to confirm interface quality.
7.3 Correct Thickness Selection (Too Thick vs. Too Thin)
Too thick: easier to assemble and tolerant to gaps, but overall thermal resistance increases significantly.
Too thin: low theoretical thermal resistance, but may not compensate for tolerances and warpage, resulting in partial contact or even open gaps in real assemblies.
A practical approach is to estimate the minimum and maximum gap in the worst-case tolerance stack, then select a TIM thickness and hardness that can accommodate those gaps while keeping thermal resistance under control.
7.4 Considering Rework and Maintenance in Luminaire Design
Some luminaires need to be repairable in the field or returned for service.
If rework is likely, removable gap pads or gels are often more convenient than permanent adhesives.
If a strong adhesive or thermal tape is required, plan a removal strategy in advance—such as heat-assisted removal, specific tools, or mechanical release features in the design.
Thinking about maintainability early can save significant cost and time later during service operations.
7.5 Validating Design with Simulation and Testing
Thermal design should be verified both virtually and physically.
At the concept stage, thermal simulation (CFD) can help identify hot spots and evaluate different material and geometry options.
During prototyping, place thermocouples at key points (e.g. LED case points, driver components, housing hot spots) and measure temperature rises under realistic operating conditions.
Use an infrared camera to visualize the overall temperature distribution and confirm that there are no unexpected hot areas.
A simple, repeatable thermal test procedure for each luminaire family is a valuable part of the design validation process.
Case Examples
The following examples are generalized scenarios that reflect typical LED thermal management challenges. You can later replace them with your own project data or merge them into your case study library.
8.1 Upgrading a COB Spotlight from 30 W to 50 W Without Lumen Drop
Initial problem
A customer wanted to upgrade an existing 30 W COB spotlight to 50 W using the same housing. Initial samples showed excessive LED junction temperatures and visible lumen drop after a short run time.
Solution
The original low-cost thermal pad was replaced with a higher-conductivity, softer gap filler to reduce interface resistance.
The heat sink geometry was slightly optimized to increase the effective fin area and improve airflow.
Result
Under the same ambient conditions, the upgraded 50 W design achieved a significantly lower junction temperature compared to the first trial, and lumen output remained stable over the test period. The customer was able to launch a higher-power version of the product without changing the external appearance.
8.2 Thermal Management for Outdoor LED Street Lights in Hot Climates
Challenges
The luminaires were installed in regions where summer ambient temperatures can reach 40–45°C.
The fixtures were IP-rated with sealed housings, limiting internal air movement.
Early prototypes showed LED and driver temperatures too high to meet the required lifetime targets.
Solution
A high-conductivity gap pad was placed between the MCPCB and the aluminum housing to ensure efficient heat transfer to the outer surface.
A graphite sheet was added inside the housing to spread heat across a larger area, reducing local hot spots.
Outcome
Follow-up testing showed more uniform temperature distribution and a noticeable reduction in LED and driver temperatures. Lifetime projections improved, and the field failure rate decreased after the new design was introduced.
8.3 Improving Reliability of LED Strips in Aluminum Profiles
Problem
In one project, LED strips were mounted in aluminum channels using a standard double-sided tape. Over time, issues appeared:
Local de-bonding of the strip from the profile.
Higher LED temperatures and visible yellowing in certain sections.
Solution
The standard tape was replaced with a specialized thermal double-sided adhesive tape designed for both reliable adhesion and improved heat transfer.
Tape width and placement were optimized so that the main LED area had consistent contact with the aluminum profile.
Result
After the change, the temperature of the LED strips became more uniform, and long-term tests showed stable color and lumen output. The number of field returns related to strip detachment or discoloration dropped significantly.
How to Work with a Thermal Interface Materials Partner
A good collaboration with a TIM supplier can save time, reduce risk, and help you reach your performance targets more efficiently.
9.1 What Information Engineers Should Prepare
To make the first technical discussion efficient, it is helpful to prepare:
LED type, total power, and module layout (COB, MCPCB, linear board, etc.).
Target junction temperature (Tj) or allowable case temperature (Tc).
Housing and heat sink materials, basic drawings, and mounting method.
Expected ambient conditions: maximum and minimum temperature, indoor/outdoor, sealed or ventilated, any airflow.
Test conditions: drive current, operating hours per day, dimming methods, and any special operating modes.
The more clearly these points are defined, the easier it becomes to propose suitable materials and a realistic thermal management concept.
9.2 Typical Support Steps
A typical support process with a TIM partner might look like this:
Initial discussion – Understand application, lifetime targets, and cost range.
Material recommendation – Propose one or two TIM options based on power density, gap size, and insulation requirements.
Sample and prototype testing – Provide samples for evaluation on real luminaires, and collect temperature data and assembly feedback.
Optimization or customization – Adjust thickness, hardness, or format (e.g. pre-cut shapes, cartridge packaging) according to test results.
Support for mass production – Help fine-tune the assembly process, such as lamination, dispensing, or curing conditions, to ensure stable quality in volume.
9.3 Benefits of Co-Design Between Luminaire Manufacturer and TIM Supplier
Involving the TIM supplier early in the design phase usually brings several advantages:
A better overall thermal architecture with fewer last-minute “fixes.”
Fewer prototype rounds and shorter development time.
A smoother transition from lab samples to mass production.
Stronger data support for warranty, lifetime claims, and certification.
For high-brightness LED systems, this collaborative approach often results in more robust and competitive products.
Conclusion and Call to Action
10.1 Why Proper Thermal Management Is Essential for High-Brightness LEDs
High-brightness LEDs can deliver excellent efficiency and long lifetime—but only if they operate within a controlled temperature range. A well-designed thermal management system protects lumen output, color stability, and electronic reliability throughout the life of the luminaire.
10.2 Key Points to Remember
Treat thermal management as a core part of the design, not a last-minute add-on.
Look at the complete thermal path from junction to ambient; every interface and material layer matters.
Select TIMs based on application requirements: thermal performance, electrical insulation, mechanical compliance, safety approvals, and long-term reliability.
Use both simulation and real measurements to confirm that the final design meets temperature and lifetime targets.
10.3 Call to Action
If you are developing or upgrading high-brightness LED products and would like support with thermal interface materials or thermal design, you are welcome to reach out.
We can help you:
Review your current thermal path and identify improvement opportunities.
Recommend suitable thermal interface materials for LED modules, drivers, and housings.
Provide samples for prototype testing and support you from early design through mass production.
A stable and efficient LED luminaire starts with a reliable thermal management strategy. The next step can be as simple as sharing your application details and starting a focused technical discussion.