Welcome to Taxo Tape
How to Verify TIM Thermal Performance Without Lab Equipment
Introduction
A thermal pad shows up in an assembly running hotter than expected. The datasheet says 5.0 W/m·K, the thermal model predicted an acceptable junction temperature, and the hardware is telling a different story. The natural next step — send samples to a lab for ASTM D5470 characterization — takes time and costs money that not every team has readily available, particularly for an early screening decision between two or three candidate materials.
The good news is that a proper lab test isn't the only way to get useful information. Most engineering decisions about TIM performance don't actually require a precise, absolute W/m·K number — they require knowing whether Material A outperforms Material B in your specific assembly, or whether a suspected problem interface is actually the source of elevated temperature. That kind of relative, practical verification is achievable with equipment most electronics teams already have on hand. This guide covers three field-accessible methods, how to set them up so the results are actually meaningful, and where their limits are.
Why "No Lab Equipment" Doesn't Mean "No Verification"
Professional thermal resistance testing under ASTM D5470 exists to produce precise, standardized, repeatable numbers that can be compared across suppliers and documented for qualification records. That precision matters for supplier comparison and formal material qualification — but it's a different requirement than what most day-to-day engineering questions actually need.
Consider the two most common situations where TIM performance gets questioned outside a formal qualification process: comparing two candidate materials to see which one performs better in your actual assembly, and investigating a suspected thermal problem to confirm whether the TIM interface is actually the cause. Neither of these requires an absolute conductivity value — they require a comparison, and comparisons can be made reliably with much simpler tools than a calibrated steady-state test fixture. The key is understanding what a given method can and can't tell you, which is covered as each method is introduced below.
Method 1: Comparative ΔT Testing
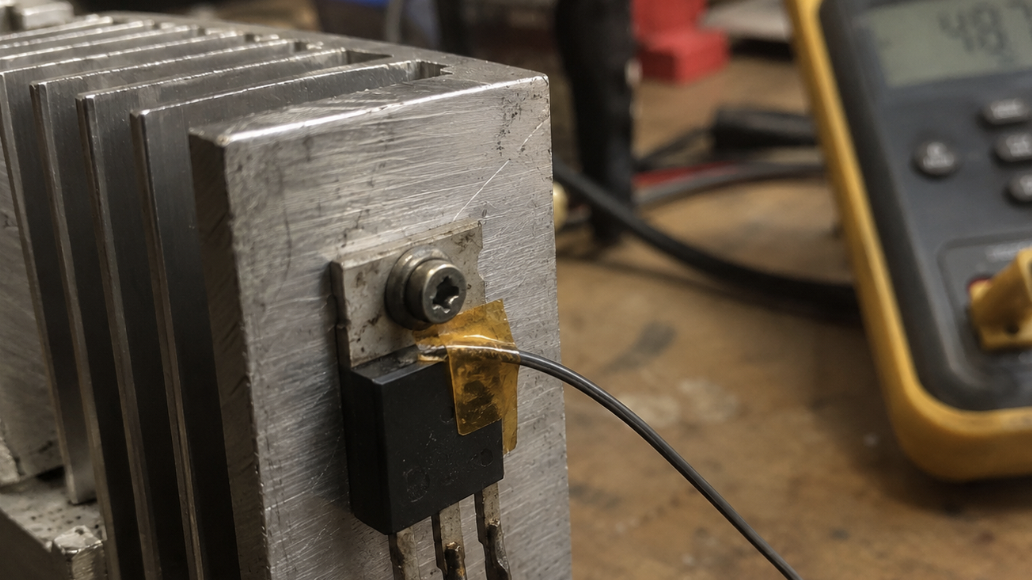
The most direct field method is measuring temperature rise (ΔT) across a component under identical power and load conditions, swapping only the TIM between test runs. If Material A produces a lower ΔT than Material B under the same conditions, Material A is delivering lower thermal resistance in your specific assembly — a conclusion that holds regardless of what either material's datasheet claims.
Setting it up: Use the same test unit, the same power supply setting, and the same ambient conditions for every run. A simple thermocouple or an inexpensive infrared thermometer, placed at a consistent measurement point (the component case, directly above the TIM interface), is sufficient instrumentation. Run the unit to thermal steady state before recording — this typically takes 15 to 30 minutes for most power components, and cutting this short is one of the most common sources of misleading results, since a component still heating up will show a lower reading than its true steady-state temperature.
Sample size matters more than most engineers expect. A single test run per material tells you almost nothing reliable — unit-to-unit variation in mounting pressure and surface contact alone can produce several degrees of difference between two assemblies using the identical material. Run at least three to five assemblies per candidate material, and compare the average and spread rather than a single data point. If the spread within one material's test group overlaps significantly with another material's group, the difference between materials isn't yet distinguishable from normal assembly variation.
Method 2: Infrared Thermal Imaging as a Screening Tool
Where ΔT testing gives you a single-point temperature reading, infrared thermal imaging gives you a spatial picture — which is particularly useful for catching problems that a single thermocouple would miss entirely. Consumer and mid-range industrial thermal cameras have become considerably more affordable in recent years, putting this tool within reach of teams that would never invest in a full ASTM D5470 test fixture.
Thermal imaging under load reveals coverage gaps, localized hot spots, and pressure non-uniformity across a component's footprint — all of which can degrade real-world performance even when the TIM material itself is entirely adequate. A component that shows an even, uniform temperature across its surface is getting consistent contact from the TIM beneath it; one showing a hot spot in one corner and cooler temperatures elsewhere points to uneven mounting pressure or incomplete TIM coverage rather than a material problem.
This method is qualitative rather than quantitative — it won't give you a W/m·K or thermal resistance number — but it's excellent for screening assembly problems before they get misattributed to the material itself. If thermal imaging shows a clear hot spot, the fix is likely in mounting pressure or TIM application, not in switching to a different material.
Method 3: Simple Bond Line Thickness Verification
Bond line thickness (BLT) — the actual compressed thickness of the TIM once it's installed — has a direct effect on thermal resistance, and it's measurable without any thermal test equipment at all. A caliper or a simple thickness gauge, combined with the material's compression stress curve if the supplier provides one, gets you a reasonable estimate of where your assembly's thermal resistance likely falls relative to the datasheet value.
How to do it: Measure the gap dimension before TIM installation, then measure the actual assembled thickness after the component is mounted and fasteners are torqued to final spec — this can be done destructively on a sample unit by careful disassembly and measurement, or non-destructively if your assembly design allows a witness measurement point. Compare the measured BLT against the pad's nominal thickness and expected compression range from its datasheet. A pad compressing significantly less than expected suggests under-torqued fasteners or an unexpectedly tight gap; compressing more than expected suggests the opposite.
This method is semi-quantitative: it doesn't measure thermal performance directly, but combined with a supplier's thickness-versus-resistance curve, it lets you estimate where your actual assembly likely sits relative to the datasheet's reference conditions — useful for catching an assembly process problem before it gets misdiagnosed as a material issue.
Setting Up a Valid Comparison Test
The value of any field verification method depends entirely on how well the test controls for variables outside the TIM itself — and this is where most informal comparisons go wrong before they even start.
Keep everything except the TIM identical. Use the same test fixture or unit, the same power dissipation level, the same ambient temperature, and the same mounting hardware and torque for every run. If the ambient temperature in your test area drifts between morning and afternoon testing sessions, that drift alone can produce a difference larger than the one you're trying to measure between materials.
Control fastener torque explicitly. Hand-tightening introduces enough operator-to-operator variation to swamp a genuine material difference — use a torque wrench or torque-controlled driver set to the same value across every test unit, not "tightened by feel." This single control eliminates one of the largest sources of false signal in informal comparison testing.
Don't trust a single data point. As covered in section 3, run multiple samples per material and look at the spread, not just the average. A difference that looks meaningful across two single measurements can disappear entirely once you see the natural variation within each material's own test group.
What These Methods Can and Can't Tell You
Field verification methods answer a narrower question than a full laboratory characterization, and it's worth being explicit about where that line sits.
These methods reliably tell you which of two or three candidates performs better in your specific assembly, and they're good at catching assembly-level problems — uneven mounting, coverage gaps, under-torqued fasteners — that would otherwise get misattributed to the material. What they don't give you is a precise, absolute thermal conductivity or thermal resistance value that can be documented for a formal qualification record or compared confidently against a supplier's datasheet claim.
For understanding what a datasheet's W/m·K value actually represents, why different suppliers' numbers for nominally similar materials aren't always directly comparable, and how test method and pressure affect the reported figures, see Why Same W/m·K Ratings Perform Differently in TIMs. The field methods in this article are a complement to that understanding, not a substitute for it — they help you make a practical decision quickly, while a real datasheet comparison still requires knowing what those numbers mean.
When to Invest in Professional Testing
Field methods are well suited to early screening — narrowing a field of candidate materials, investigating a suspected assembly problem, or making a low-risk substitution decision where the consequence of being slightly wrong is manageable. They're not a substitute for formal characterization in every situation.
Professional ASTM D5470 testing, along with supplier batch data and long-term reliability data, becomes worth the investment before committing to production volume, for safety-relevant applications — battery packs, high-voltage isolation interfaces — where the cost of an undetected performance gap is high, and for any application with a long service life target where compression set, aging, and thermal cycling stability matter as much as initial performance. How to Validate a TIM Supplier covers what to request from a supplier and how to structure that more rigorous qualification process once field screening has narrowed your options.
A Quick Field Verification Checklist
Before running a comparison: confirm identical power dissipation, ambient temperature, and mounting torque across all test units. Allow full thermal steady state — typically 15 to 30 minutes — before recording any temperature reading. Run a minimum of three to five samples per candidate material rather than relying on single measurements. Use thermal imaging, where available, to screen for coverage gaps or pressure non-uniformity before concluding a temperature difference is due to the material itself. Measure actual bond line thickness against the supplier's expected compression range if a compression curve is available. And document test conditions alongside results — a temperature reading without recorded power level, ambient condition, and torque value can't be meaningfully compared to a later test run.
FAQ
Q: How close do field verification results come to professional lab data?
Field methods are good at establishing relative ranking — which material performs better in your assembly — but they won't match the precision of a calibrated ASTM D5470 measurement in absolute terms. Expect field ΔT comparisons to reliably detect differences of a few degrees between materials when the test is well controlled; smaller differences may fall within the noise of assembly variation and require more rigorous testing to confirm.
Q: Can I use these methods to verify a supplier's datasheet claim?
You can use them to sanity-check whether a material performs reasonably in your assembly, but they're not a rigorous way to confirm or dispute a specific datasheet number, since field methods don't isolate bulk material conductivity from contact resistance and assembly-specific factors the way a controlled lab test does. For a direct challenge to a supplier's claimed value, request their test method and pressure data, and consider third-party lab verification for high-stakes decisions.
Q: What's the minimum equipment needed to start field verification?
A power supply capable of representative loading, a thermocouple or infrared thermometer, and a torque wrench or torque-controlled driver cover the basics for comparative ΔT testing — the most accessible of the three methods. A caliper adds bond line thickness verification at minimal additional cost. Thermal imaging requires the largest incremental investment but adds spatial diagnostic capability the other two methods can't provide.
Conclusion
Not having access to a certified thermal resistance test lab isn't a reason to skip verification entirely — it's a reason to be clear-eyed about what a simpler method can and can't tell you, and to use it for the questions it's actually suited to answer. Comparative ΔT testing, thermal imaging, and bond line thickness checks won't replace a formal ASTM D5470 characterization for a production qualification decision, but they're genuinely useful for early screening, catching assembly problems before they're misdiagnosed as material issues, and making practical day-to-day engineering decisions with reasonable confidence.
When the stakes rise — production commitment, safety-relevant applications, long service life targets — that's the point to move from field verification to the more rigorous processes covered in Why Same W/m·K Ratings Perform Differently in TIMs and How to Validate a TIM Supplier.